APIの概要
先に進む前に、Socket.IOが提供するAPIを簡単に見てみましょう。
共通API
以下のメソッドは、クライアントとサーバーの両方で使用できます。
基本的なemit
ステップ4で見たように、`socket.emit()`を使用して相手に任意のデータを送信できます。
- クライアントからサーバーへ
- サーバーからクライアントへ
クライアント
socket.emit('hello', 'world');
サーバー
io.on('connection', (socket) => {
  socket.on('hello', (arg) => {
    console.log(arg); // 'world'
  });
});
サーバー
io.on('connection', (socket) => {
  socket.emit('hello', 'world');
});
クライアント
socket.on('hello', (arg) => {
  console.log(arg); // 'world'
});
任意の数の引数を送信でき、ArrayBuffer、TypedArray、Buffer (Node.jsのみ)などのバイナリオブジェクトを含む、すべてのシリアライズ可能なデータ構造がサポートされています。
- クライアントからサーバーへ
- サーバーからクライアントへ
クライアント
socket.emit('hello', 1, '2', { 3: '4', 5: Uint8Array.from([6]) });
サーバー
io.on('connection', (socket) => {
  socket.on('hello', (arg1, arg2, arg3) => {
    console.log(arg1); // 1
    console.log(arg2); // '2'
    console.log(arg3); // { 3: '4', 5: <Buffer 06> }
  });
});
サーバー
io.on('connection', (socket) => {
  socket.emit('hello', 1, '2', { 3: '4', 5: Buffer.from([6]) });
});
クライアント
socket.on('hello', (arg1, arg2, arg3) => {
  console.log(arg1); // 1
  console.log(arg2); // '2'
  console.log(arg3); // { 3: '4', 5: ArrayBuffer (1) [ 6 ] }
});
オブジェクトに対して`JSON.stringify()`を呼び出す必要はありません。
// BAD
socket.emit('hello', JSON.stringify({ name: 'John' }));

// GOOD
socket.emit('hello', { name: 'John' });
確認応答
イベントは素晴らしいですが、場合によっては、より古典的なリクエスト-レスポンスAPIが必要になることがあります。Socket.IOでは、この機能は「確認応答」と呼ばれています。
これは2つの方法があります。
コールバック関数を使用する
`emit()`の最後の引数としてコールバックを追加できます。このコールバックは、相手側がイベントを確認応答した後に呼び出されます。
- クライアントからサーバーへ
- サーバーからクライアントへ
クライアント
socket.timeout(5000).emit('request', { foo: 'bar' }, 'baz', (err, response) => {
  if (err) {
    // the server did not acknowledge the event in the given delay
  } else {
    console.log(response.status); // 'ok'
  }
});
サーバー
io.on('connection', (socket) => {
  socket.on('request', (arg1, arg2, callback) => {
    console.log(arg1); // { foo: 'bar' }
    console.log(arg2); // 'baz'
    callback({
      status: 'ok'
    });
  });
});
サーバー
io.on('connection', (socket) => {
  socket.timeout(5000).emit('request', { foo: 'bar' }, 'baz', (err, response) => {
    if (err) {
      // the client did not acknowledge the event in the given delay
    } else {
      console.log(response.status); // 'ok'
    }
  });
});
クライアント
socket.on('request', (arg1, arg2, callback) => {
  console.log(arg1); // { foo: 'bar' }
  console.log(arg2); // 'baz'
  callback({
    status: 'ok'
  });
});
Promiseを使用する
`emitWithAck()`メソッドは同じ機能を提供しますが、相手側がイベントを確認応答すると解決されるPromiseを返します。
- クライアントからサーバーへ
- サーバーからクライアントへ
クライアント
try {
  const response = await socket.timeout(5000).emitWithAck('request', { foo: 'bar' }, 'baz');
  console.log(response.status); // 'ok'
} catch (e) {
  // the server did not acknowledge the event in the given delay
}
サーバー
io.on('connection', (socket) => {
  socket.on('request', (arg1, arg2, callback) => {
    console.log(arg1); // { foo: 'bar' }
    console.log(arg2); // 'baz'
    callback({
      status: 'ok'
    });
  });
});
サーバー
io.on('connection', async (socket) => {
  try {
    const response = await socket.timeout(5000).emitWithAck('request', { foo: 'bar' }, 'baz');
    console.log(response.status); // 'ok'
  } catch (e) {
    // the client did not acknowledge the event in the given delay
  }
});
クライアント
socket.on('request', (arg1, arg2, callback) => {
  console.log(arg1); // { foo: 'bar' }
  console.log(arg2); // 'baz'
  callback({
    status: 'ok'
  });
});
Promiseをサポートしていない環境(Internet Explorerなど)では、この機能を使用するためにポリフィルを追加するか、babelなどのコンパイラを使用する必要があります(ただし、これはこのチュートリアルの範囲外です)。
キャッチオールリスナー
キャッチオールリスナーとは、受信するすべてのイベントに対して呼び出されるリスナーです。これは、アプリケーションのデバッグに役立ちます。
送信者
socket.emit('hello', 1, '2', { 3: '4', 5: Uint8Array.from([6]) });
受信者
socket.onAny((eventName, ...args) => {
  console.log(eventName); // 'hello'
  console.log(args); // [ 1, '2', { 3: '4', 5: ArrayBuffer (1) [ 6 ] } ]
});
同様に、送信パケットの場合
socket.onAnyOutgoing((eventName, ...args) => {
  console.log(eventName); // 'hello'
  console.log(args); // [ 1, '2', { 3: '4', 5: ArrayBuffer (1) [ 6 ] } ]
});
サーバーAPI
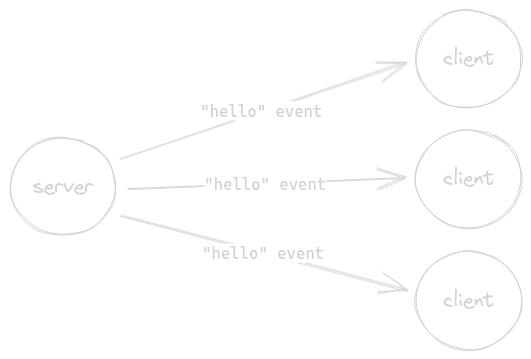
ブロードキャスト
ステップ5で見たように、`io.emit()`を使用して、接続されているすべてのクライアントにイベントをブロードキャストできます。
io.emit('hello', 'world');

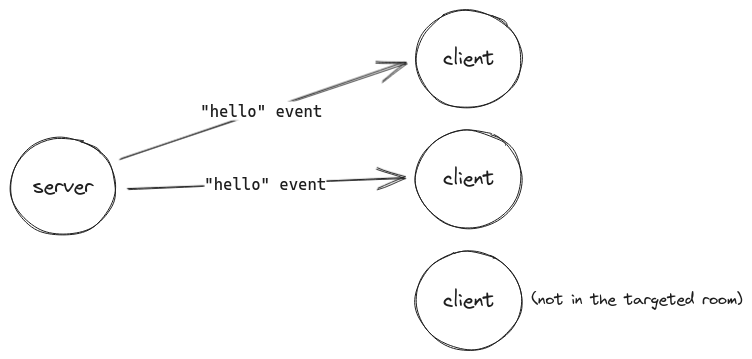
ルーム
Socket.IOの用語では、*ルーム*とは、ソケットが参加および退出できる任意のチャネルです。接続されているクライアントのサブセットにイベントをブロードキャストするために使用できます。
io.on('connection', (socket) => {
  // join the room named 'some room'
  socket.join('some room');

  // broadcast to all connected clients in the room
  io.to('some room').emit('hello', 'world');

  // broadcast to all connected clients except those in the room
  io.except('some room').emit('hello', 'world');

  // leave the room
  socket.leave('some room');
});